Thursday, December 20, 2012

Ant build with lib


Cấu trúc folder :


file Java :

 package oata;  
import org.apache.log4j.Logger;
import org.apache.log4j.BasicConfigurator;
public class HelloWorld {
static Logger logger = Logger.getLogger(HelloWorld.class);
public static void main(String[] args) {
BasicConfigurator.configure();
logger.info("Hello World"); // the old SysO-statement
}
}

File log4j.properties :

 log4j.rootLogger=DEBUG, stdout  
log4j.appender.stdout=org.apache.log4j.ConsoleAppender
log4j.appender.stdout.layout=org.apache.log4j.PatternLayout
log4j.appender.stdout.layout.ConversionPattern=%m%n


File build :


 <project name="HelloWorld" basedir="." default="main">  
<property name="src.dir" value="src" />
<property name="build.dir" value="build" />
<property name="classes.dir" value="${build.dir}/classes" />
<property name="jar.dir" value="${build.dir}/classes" />
<property name="main-class" value="oata.HelloWorld" />
<property name="lib.dir" value="lib"/>
<path id="classpath">
<fileset dir="${lib.dir}" includes="**/*.jar"/>
</path>
<target name="clean">
<delete dir="${build.dir}" />
</target>
<target name="compile">
<mkdir dir="${classes.dir}" />
<javac srcdir="${src.dir}" destdir="${classes.dir}" classpathref="classpath"/>
<copy todir="${classes.dir}">
<fileset dir="${src.dir}" excludes="**/*.java"/>
</copy>
</target>
<target name="jar" depends="compile">
<mkdir dir="${jar.dir}" />
<jar destfile="${jar.dir}/${ant.project.name}.jar" basedir="${classes.dir}" >
<manifest>
<attribute name="Main-Class" value="${main-class}" />
</manifest>
</jar>
</target>
<target name="run" depends="jar">
<java fork="true" classname="${main-class}" >
<classpath>
<path refid="classpath" />
<path id="application" location="${jar.dir}/${ant.project.name}.jar" />
</classpath>
</java>
</target>
<target name="clean-build" depends="clean,jar" />
<target name="main" depends="clean,run" />
</project>

Wednesday, December 19, 2012

How to change the ‘root’ password for MySQL in XAMPP?

By default, when you install XAMPP in your windows machine, the ‘root’ password for the MySQL is set to empty. But this is not recommended, as the MySQL database without a password will be accessible to everyone. To avoid this, a proper/secure password must be set to the user ‘root‘. To do it in XAMPP, there are two ways.


Method 1: 

Reset XAMPP MySQL root password through web interface: After you started your XAMPP server, go to the browser and type the URL http://localhost/security/ (incase you’ve modified XAMPP server port, you need to include that port number also in previous URL). The security page will be shown where you can change the ‘root’ password for MySQL. This will update the phpMyAdmin config also.


Method 2: reset XAMPP MySQL root password through SQL update

  1. Start the Apache Server and MySQL instances from the XAMPP control panel.
  2. After the server started, open any web browser and givehttp://localhost:8090/phpmyadmin/ (if you are running XAMPP on 8090 port). This will open the phpMyAdmin interface. Using this interface we can manager the MySQL server from the web browser.
  3. In the phpMyAdmin window, select SQL tab from the right panel. This will open the SQL tab where we can run the SQL queries.
  4. Now type the following query in the textarea and click Go
    UPDATE mysql.user SET Password=PASSWORD('password') WHERE User='root';
    FLUSH PRIVILEGES;
  5. Now you will see a message saying that the query has been executed successfully.
  6. If you refresh the page, you will be getting a error message. This is because the phpMyAdmin configuration file is not aware of our newly set root passoword. To do this we have to modify the phpMyAdmin config file.
  7. Open the file [XAMPP Installation Path] / phpmyadmin / config.inc.php in your favorite text editor.
  8. Search for the string $cfg['Servers'][$i]['password'] = ”; and change it to like this, $cfg['Servers'][$i]['password'] = ‘password’; Here the ‘password’ is what we set to the ‘root’ user using the SQL query.
  9. Now all set to go. Save the config.inc.php file and restart the XAMPP server.

references : http://veerasundar.com/blog/2009/01/how-to-change-the-root-password-for-mysql-in-xampp/


PS : Some initializing information when run :/opt/lampp/lampp security

XAMPP:  Quick security check...
XAMPP:  Your XAMPP pages are NOT secured by a password.
XAMPP: Do you want to set a password? [yes]
XAMPP: Password:
XAMPP: Password (again):
XAMPP:  Password protection active. Please use 'xampp' as user name!
XAMPP:  MySQL is accessable via network.
XAMPP: Normaly that's not recommended. Do you want me to turn it off? [yes]
XAMPP:  Turned off.
XAMPP:  MySQL has to run before I can check the security.
XAMPP:  MySQL has a root passwort set. Fine! :)
XAMPP:  The FTP password for user 'daemon' is still set to 'xampp'.
XAMPP: Do you want to change the password? [yes]
XAMPP: Password:
XAMPP: Password (again):
XAMPP: Reload ProFTPD...not running.
XAMPP:  Done.


Tuesday, December 18, 2012

Các thao tác cơ bản trên DB2

Phần 1 :

File code tạo table trong cơ sở dữ liệu DB2

File này có tên là testdb.sql

1:  CREATE TABLE EMPLOYEE(  
2: ID SMALLINT NOT NULL,
3: NAME VARCHAR(9),
4: DEPT SMALLINT CHECK (DEPT BETWEEN 10 AND 100),
5: JOB CHAR(5) CHECK (JOB IN ('Sales', 'Mgr', 'Clerk')),
6: SALARY DECIMAL(7,2),
7: COMM DECIMAL(7,2),
8: PRIMARY KEY (ID)
9: );


Phần 2 :

Các lệnh cơ bản trong DB2


1:  start database :  
2: DB2 START
3: create database :
4: DB2 CREATE DATABASE TESTDB3 AUTOMATIC STORAGE YES
5: list database :
6: DB2 LIST DB DIRECTORY
7: connect with database :
8: DB2 CONNECT TO TESTDB02
9: list of tables :
10: DB2 LIST TABLES
11: create tables from files:
12: db2 -tvf sql_file_name
13: insert value to table:
14: INSERT INTO EMPLOYEE VALUES ( 1, 'DucNguyen', 11, 'Mgr', 3200, 4500)
15: INSERT INTO EMPLOYEE VALUES ( 3, 'ThienPham', 13, 'Clerk', 3500, 4000)
16: INSERT INTO EMPLOYEE VALUES ( 5, 'TungPham', 13, 'Sales', 3600, 4530)
17: INSERT INTO EMPLOYEE(ID, NAME, DEPT, JOB, SALARY, COMM) VALUES (2,'VuTruong',11,'Sales',3500,4000)
18: select all rows from table:
19: SELECT * FROM EMPLOYEE

Phần 3 : Code Java kết nối DB2 File name : EzJava.java
1:  import java.sql.*;  
2: public class EzJava
3: {
4: public static void main(String[] args)
5: {
6: String urlPrefix = "jdbc:db2:";
7: String url= urlPrefix +"//127.0.0.1:50000/TESTDB02";
8: String user="db2inst1";
9: String password="123456";
10: String empNo = null;
11: String empName =null;
12: Connection con=null;
13: Statement stmt=null;
14: ResultSet rs=null;
15: System.out.println ("**** Enter class EzJava");
16: try
17: {
18: // Load the driver
19: Class.forName("com.ibm.db2.jcc.DB2Driver");
20: System.out.println("**** Loaded the JDBC driver");
21: // Create the connection using the IBM Data Server Driver for JDBC and SQLJ
22: con = DriverManager.getConnection (url, user, password);
23: // Commit changes manually
24: con.setAutoCommit(false);
25: System.out.println("**** Created a JDBC connection to the data source");
26: // Create the Statement
27: stmt = con.createStatement();
28: System.out.println("**** Created JDBC Statement object");
29: // Execute a query and generate a ResultSet instance
30: rs = stmt.executeQuery("SELECT ID FROM EMPLOYEE");
31: System.out.println("**** Created JDBC ResultSet object");
32: // Print all of the employee numbers to standard output device
33: while (rs.next()) {
34: empNo = rs.getString(1);
35: empName = rs.getString(2);
36: System.out.println("ID : " + empNo+" | Name : " + empName);
37: }
38: System.out.println("**** Fetched all rows from JDBC ResultSet");
39: // Close the ResultSet
40: rs.close();
41: System.out.println("**** Closed JDBC ResultSet");
42: // Close the Statement
43: stmt.close();
44: System.out.println("**** Closed JDBC Statement");
45: // Connection must be on a unit-of-work boundary to allow close
46: con.commit();
47: System.out.println ( "**** Transaction committed" );
48: // Close the connection
49: con.close();
50: System.out.println("**** Disconnected from data source");
51: System.out.println("**** JDBC Exit from class EzJava - no errors");
52: }
53: catch (ClassNotFoundException e)
54: {
55: System.err.println("Could not load JDBC driver");
56: System.out.println("Exception: " + e);
57: e.printStackTrace();
58: }
59: catch(SQLException ex)
60: {
61: System.err.println("SQLException information");
62: while(ex!=null) {
63: System.err.println ("Error msg: " + ex.getMessage());
64: System.err.println ("SQLSTATE: " + ex.getSQLState());
65: System.err.println ("Error code: " + ex.getErrorCode());
66: ex.printStackTrace();
67: ex = ex.getNextException(); // For drivers that support chained exceptions
68: }
69: }
70: } // End main
71: } // End EzJava


Cài đặt XAMMP trên LINUX với NOMAL USER

Bước 1 : Sau khi cài đặt chúng ta chuyển đến folder chứa LAMMP :

#cd /opt/lampp/

Liệt kê danh sách file trong thư mục gốc của LAMMP :


Nhiệm vụ được đặt ra là đổi nobody thành tên username của chúng ta :

Bước 2 : Cần phải xác định được username mà chúng ta đang sử dụng là gì :

#whoami

Xác định user-name đang sử dụng thuộc group nào :

#goups


như hình trên ta có user-name : vanduc1102 thuộc về 2 group là rootdb2iadm1

Bước 3: Cấp quyền sử dụng cho thư mục  htdocs


Bước 4 :

mở file httpd.conf trong /opt/lammp/etc/


# gedit /opt/lampp/etc/httpd.conf 


xem đoạn

User nobody

Group nogroup

</IfModule>

</IfModule>


Và đổi thành

User vanduc1102

Group nogroup

</IfModule>

</IfModule>


Khởi động lại lammp là ok .
#/opt/lammp/lammp start

Liệt kê các port đang được mở và mở port

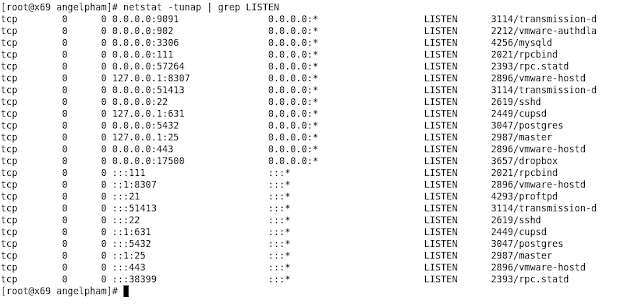
Chúng ta sử dụng lệnh sau :

netstat -tunap | grep LISTEN

Ví dụ :


Hoặc :


Scan all port Openning in centos using :

nmap 127.0.0.1


If you want to open a single port:

open iptables file : vi /etc/sysconfig/iptables

Add below line to open port.

-A INPUT -m state --state NEW -m tcp -p tcp --dport 143 -j ACCEPT

For multiple, you can use the following instead (or repeat the above line multiple times):

-A INPUT -m state --state NEW -m tcp -p tcp -m multiport --dports 22,80,143 -j ACCEPT

The reason your line doesn't work is likely because you don't have a chain named 'RH-Firewall-1-INPUT'.

CentOS 6 simply uses 'INPUT' as the chain name.

You'll note something like the following at the top of the default config, naming the chains that exist:

:INPUT ACCEPT [0:0]
:FORWARD ACCEPT [0:0]
:OUTPUT ACCEPT [0:0]

Just to explain a bit further, the line -A INPUT -m state --state NEW -m tcp -p tcp --dport 143 -j ACCEPT means:

-A: append a rule
INPUT: to the INPUT chain
-m state: use the 'state' module
--state NEW: only look for NEW connections (i.e. not those that are previously established/related)
-m tcp: use the tcp module
-p tcp: look for packets using the TCP protocol
--dport 143: look for packets with a destination port of 143


To save  :
#/sbin/service iptables save
#/etc/init.d/iptables restart